3 easy steps to make your Blogger blog a Website
 |
| By: Scott Beale Laughing Squid. Remixed under Creative Commons License. |
The 3 steps are explained in detail below but here they are if you are wondering what they are:
- Eliminate the Blogger Navbar
- Add a Favicon
- Use a custom URL
1. Eliminate the Blogger NavBar

Ok now open the find on page feature of your browser. Find this text string: "]]>" you should find two of them. On the line just before the first ]]> add this: "#navbar { display: none; }". It should look like this:
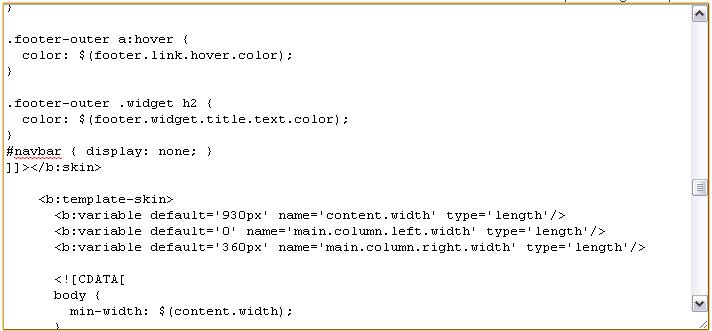
Now click "Save Template" at the bottom and Voila! The nav bar is gone!
2. Adding a Favicon
A favicon is a cool little thing. What is it? Check out your browser's address bar or the tab right now and you should see a little icon I made in Paint that is a red KE and a light blue background with an outline unless you are using Safari which sometimes mucks up favicons. On a tabbed browser these are seen on the tabs. Ever wonder how to get one? Wonder no longer.
First you need to decide on an image. It can be anything but remember it's going to be tiny (16 x 16 pixels) so make sure it is visible and means something. You can use Paint, Photoshop or Gimp to create an image that is 16 x 16. In some instructions that's all you have to do but sometimes the image needs to be converted to a format called ".ico".
To do that simply download Imagicon for PC or Favicon Generator for Mac both are free software. Open your image in this program and save it as a 16x16 .ico file. Now that you have your favicon it's time to get it uploaded and in use.
To upload the photo simply open up a new blog post or any post and click the "insert image" button and upload the image. Once the image is uploaded you can delete it from the post as it is now in your Picasa web album that's associated with your blog. Now click the "Insert Image" button again. This time click "From Picasa Web Albums" the image you uploaded should appear right there. Right click it and copy image URL.
Copy the text below this and replace 'IMAGE URL' with the URL of your image from above.
<link href="IMAGE URL" rel="shortcut icon" type="image/vnd.microsoft.icon/"/>
Take this finished snippet of text which should now look something like this:
<link href="https://blogger.googleusercontent.com/img/b/R29vZ2xl/AVvXsEiDGs0nqYZjqc-ZvwEj4KlAnznCQnETJvAwDX80cqqBmBJuOPUCxTn0VIfCx-BXGM8Dca2XcaT_ufKhQHvHDCeyWs0KbHqZDJ5hZAj59Ta1ID_1Qn5vQkGZ_oxgbaMHlAIdTB12hvh7LQ2R/s104/muffinman.PNG" rel="shortcut icon" type="image/vnd.microsoft.icon/"/>
Now open up the HTML of your blog again and expand the templates widgets by making sure the box is checked. This time use the Find on page feature to find: "/head". Now just before this place your snippet of text as above. Now save the template and Voila! Your blog has a favicon!
3. Use a custom URL
The last and most important thing for your website is that it has it's own URL or web address like kempedmonds.com. This part if super easy but cost $10/year. Go into blogger and go to the "Settings" tab then the "Publishing" tab then click on "Custom Domain". This will take you through the process of registering your custom domain. Make sure to forward your naked domain (kempedmonds.com) to your full domain (www.kempedmonds.com) to ensure that people get to your site as Blogger won't show your content on a naked domain (kempedmonds.com)
 That's it! It's quite simple to setup a blogger blog in the same fashion as a website especially now with Blogger's addition of the pages feature which can give you custom tabs/pages within your site. Remember to link back and tell your friends about this tool as it makes managing a simple site a lot easier and a lot cheaper.
Drop me a line with questions about how this works or you are having trouble kempedmonds at gmail.com
To upload the photo simply open up a new blog post or any post and click the "insert image" button and upload the image. Once the image is uploaded you can delete it from the post as it is now in your Picasa web album that's associated with your blog. Now click the "Insert Image" button again. This time click "From Picasa Web Albums" the image you uploaded should appear right there. Right click it and copy image URL.
Copy the text below this and replace 'IMAGE URL' with the URL of your image from above.
<link href="IMAGE URL" rel="shortcut icon" type="image/vnd.microsoft.icon/"/>
Take this finished snippet of text which should now look something like this:
<link href="https://blogger.googleusercontent.com/img/b/R29vZ2xl/AVvXsEiDGs0nqYZjqc-ZvwEj4KlAnznCQnETJvAwDX80cqqBmBJuOPUCxTn0VIfCx-BXGM8Dca2XcaT_ufKhQHvHDCeyWs0KbHqZDJ5hZAj59Ta1ID_1Qn5vQkGZ_oxgbaMHlAIdTB12hvh7LQ2R/s104/muffinman.PNG" rel="shortcut icon" type="image/vnd.microsoft.icon/"/>
Now open up the HTML of your blog again and expand the templates widgets by making sure the box is checked. This time use the Find on page feature to find: "/head". Now just before this place your snippet of text as above. Now save the template and Voila! Your blog has a favicon!
3. Use a custom URL
The last and most important thing for your website is that it has it's own URL or web address like kempedmonds.com. This part if super easy but cost $10/year. Go into blogger and go to the "Settings" tab then the "Publishing" tab then click on "Custom Domain". This will take you through the process of registering your custom domain. Make sure to forward your naked domain (kempedmonds.com) to your full domain (www.kempedmonds.com) to ensure that people get to your site as Blogger won't show your content on a naked domain (kempedmonds.com)

Drop me a line with questions about how this works or you are having trouble kempedmonds at gmail.com
Subscribe to:
Post Comments (Atom)


Love it! Used it on my blogger blog just now and it looks great!
ReplyDeletethanks for the tip!